Monday 8 January 2018

How to export and import MDS metadata in SOA Suite 12c Em console

In this post we will see how to export and import MDS metadata from oracle enterprise manager console to the file system.
Export –>
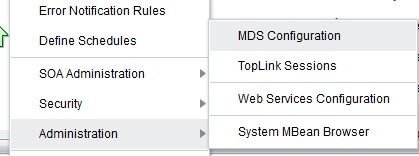
Login to Em console and click on SOA-Infra and MDS Configuration.
mdsim
Select the option “Export metadata document to an archive on the machine where this web browser is running” and Click on Export.
mdsim1
Once after you press OK, it will take some time to export the meta data to a file.
If you open the file , it will show you fault policies, wsdl, xml schema and all configuration settings of your server.
Import –>
Login to Em console and click on SOA-Infra and MDS Configuration.
mdsim
Select the option “Import metadata documents from an archive on the machine where this browser is running ” and Click on browse to select the file and click on Import.
mdsim2

Working with DVM in Oracle SOA Suite 12C

Here we will see how to create and use DVM’s in oracle SOA Suite 12C.
DVM is an interesting topic in Oracle SOA Suite which will allow you to map values used in one domain for specific field to the value used in other doamin for same field.
For example some domains might use the code as country (IN), where as the other doamin can use the complete name as the country (INDIA) . In these cases we can use domain value maps.
If any time you want to change these dvm values or add any any values to your DVM, then you no need to do the code change , you can change these values runtime in soa composer.
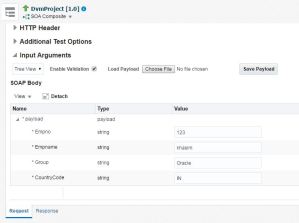
 My input:-
dvm
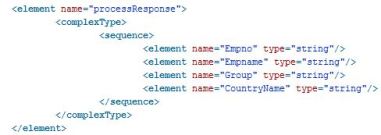
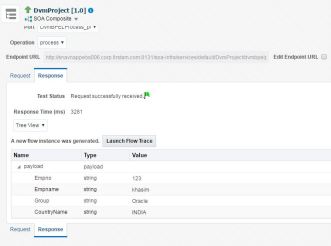
My Output :-
dvm1
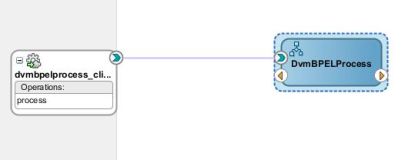
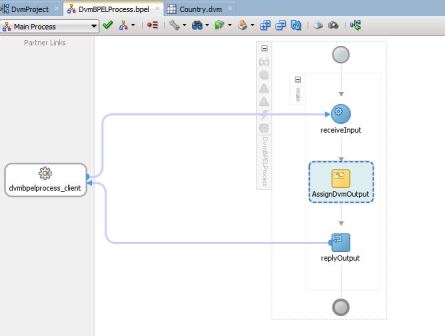
Now I have created a synchronous BPEL process with above schema and named it as “DvmBPELProcess”
dvm2.JPG
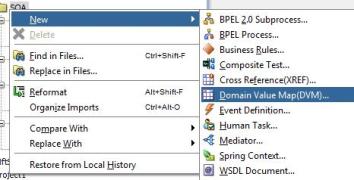
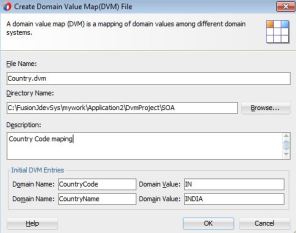
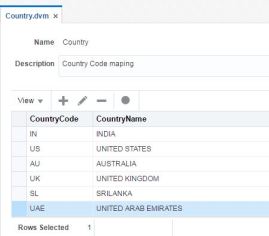
Now Right click on the project and go to new and click on “DomainValueMap(DVM)” to create a dvm file.
dvm3
It will open a new window , provide file name for dvm, doamin name , domain value and click on OK.
dvm4
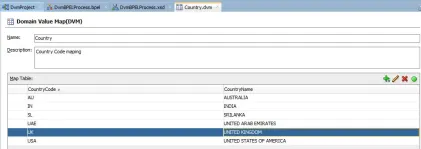
Country DVM will gets created, now you can add the rest country’s and SAVE.
dvm5
For using this dvm file in your bpel process you have to use the below function.
dvm:lookupValue(dvmMetadataURI as string, SourceColumnName as string, SourceValue as string, TargetColumnName as string, DefaultValue as string) as string
As per above function it will take the dvm name and source column and source value to be looked in the dvm and target column name which value has to be derived from DVM.
Now open your BPEL process and we have to manipulate the Country code to pick the value from DVM and send to output.
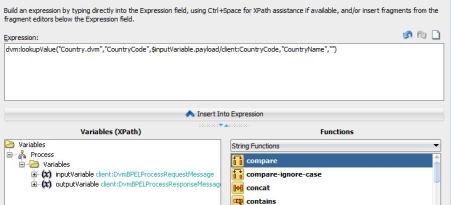
Our expression looks like this .
dvm:lookupValue(“Country.dvm”,”CountryCode”,$inputVariable.payload/client:CountryCode,”CountryName”,””)
dvm6dvm7
Now click Ok , SAVE all and deploy the code and test the results.
Input –>
dvm8
Output –>
dvm9
Checking the DVM in SOA Composer –>
Login to your soa composer and open the project , you will find Country.dvm
dvm10
Click on the DVM , here you can create and update the existing maps SAVE and then Publish.
dvm11

Domain Value Map Functions in SOA

In this post we will see some of the available DVM functions.
dvm:lookupValue –>
Syntax ##
dvm:lookupValue(mapName, referenceElementName, referenceValue, elementName, defaultValue, needAnException)
Description ##
The dvm:lookupValue function finds the reference element value in a domain value map and returns the equivalent value of the specified element name as a string. This form of DVM lookup is used to find a single reference element and return a single element value.
Example ##
The following code looks up the value of the Short element in the CityCodes DVM map corresponding to the Bangalore value in the Long element:
dvm:lookupValue(“CityCodes”,”Long”,”Bangalore”,”Short”,”NotFound”,True).
dvm:lookupValueNVP –> 
Syntax ##
dvm:lookupValueNVP(mapName, referenceDomain, referenceNVP, targetDomain, defaultNVP, needAnException)
Description ##
The dvm:lookupValueNVP function finds the reference domain element values in a DVM and returns the equivalent values of all elements in the specified domain as an NVP list. This form of DVM lookup should be used when multiple elements exist in either the reference or return domain. All required elements in the reference domain must be included in the reference NVP list, but optional elements (qualifiers perhaps) do not have to be included. The return string will include values for all elements in the target domain as an NVP list regardless of whether they are required.
dvm:lookup-dvm –>
Syntax ##
dvm:lookup-dvm (mapName, referenceElementName, referenceValue, elementName, defaultValue, needAnException)
Description ## 
The dvm:lookup-dvm function finds the reference element value in a domain value map and returns the equivalent value of the specified element name as a string. This form of DVM lookup is used to find a single reference element and return a single element value. Lookups involving multiple elements in a reference or return domain need to be done using the dvm:lookupValueNVP function. This function is identical in purpose and function to the dvm:lookupValue function. It exists to mimic the function names defined in the ESB implementation of DVM.
Example ##
The following code looks up the value of the Long element in the CityCodes DVM map corresponding to the value in the Abbrev element:
dvm:lookup-dvm(“CityCodes”,”Abbrev”,”Bang”,”Long”,”NotFound”, True)

Performance Modularity profiles in SOA Suite 12C

Performance Modularity profiles is a new feature introduced in SOA Suite 12C.
12c is much lighter and faster then 11g. In 11g the installation and start up times were high and it has a high memory footprint. SOA Suite 12c changes the game with faster start up times and optimized memory usage.
By default the SOA_FOUNDATION profile is configured after new installation. This can then be altered in EM. If you upgrade from SOA Suite 11g it will get the SOA_CLASSIC as the default profile. The SOA_CLASSIC profile has the largest footprint and the BPEL_ONLY profile has the least footprint, showing a 30% difference between them.
The profiles listed below are arranged in decreasing order of (memory) footprint
– SOA CLASSIC SOA -> Foundation with B2B + BPM Modules
– SOA FOUNDATION WITH HEALTHCARE -> SOA Foundation with B2B + Healthcare UI
– SOA FOUNDATION WITH B2B -> SOA Foundation Enterprise + B2B
– SOA FOUNDATION ENTERPRISE -> SOA Foundation + Full Adapter Set
– SOA FOUNDATION -> Orchestration + Mediator + Rules + Partial Adapter set
– ORCHESTRATION -> BPEL-Only + HWF + Partial Adapter set
– BPEL-ONLY -> BPEL Components + SOA Common Infrastructure + Partial Adapter set
Main uses of this will be  ->
1. Reduce the overall memory footprint of the SOA Infrastructure.
2. Make Oracle SOA Suite a more modular platform. You load only the functionality you need to use.
3. Reduce overall class loading and overall startup time of the server.
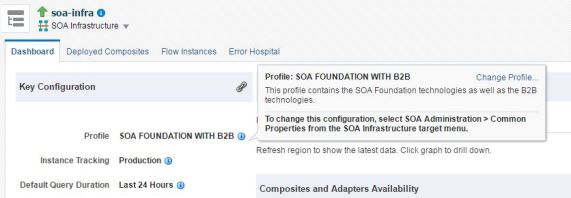
We can see the profiles and change the profiles as below.
siapro
siapro1

Unable to find a WSDL that has a definition for service

Issue –> While deploying a SOA project in Jdeveloper i got the below error.
Error –>
Received HTTP response from the server, response code=500
Error deploying archive sca_myTaxProcess_rev1.0.jar to partition “default” on server soa_server1 [http://localhost:8001] 
HTTP error code returned [500]
Error message from server:
There was an error deploying the composite on soa_server1: Deployment Failed: Unable to find a WSDL that has a definition for service {http://xmlns.oracle.com/soa/soaTaxProcess/TaxRateProcess}TaxRateProcess.service and port TaxProcessPort.  Please make sure that the port attribute for the binding defined in the composite file is correct by checking the namespace, service name, and port name.  In addition, check that the WSDL associated with the binding namespace is imported and currently reachable (check the import nodes at the top of the composite file). Finally, validate the HTTP proxy settings for the server..
Solution –> 
Actually the referenced webservice’s hostname mapping was missing in my “new” environment because of which the SOA composite was unable to find the WSDL during deployment.

Changing the port of SOA server using wlst

Here we will see , how to change the port of soa server offline using wlst commands.
Start the WLST
Login to your unix box and navigate to your bin folder and run the command.
[testuser@soaserver]$ cd /u01/oracle/SOAInstall/soa/common/bin
[testuser@soaserver]$ ./wlst.sh
wls:/fmw_domain/serverConfig>connect(‘username,’pwd’, ‘hostname:7001’)
wls:/fmw_domain/serverConfig>readDomain(“/u01/oracle/SOAInstall/user_projects/domains/SOAdomain”)
wls:/fmw_domain/serverConfig>cd(“Servers/AdminServer”)
wls:/fmw_domain/serverConfig> setListenPort(7002)
wls:/fmw_domain/serverConfig>updateDomain()

Exporting MDS metadata using WLST

Here we will see , how to export MDS metadata using wlst commands.
login to your unix box  and launch wlst.
[testuser@soaserver]$ cd /u01/oracle/SOAInstall/soa/common/bin
[testuser@soaserver]$ ./wlst.sh
wls:/fmw_domain/serverConfig>connect(‘username,’pwd’, ‘hostname:7001’)
wls:/fmw_domain/serverConfig>listApplications()
wls:/fmw_domain/serverConfig>exportMetadata(application=’soa-infra’, server=’soa_server1′, toLocation=’/u01/oracle/MyMetadata’)

Changing admin password of oracle weblogic server

Most of the times we use to forgot the admin passwords of weblogic server.
Here we will discuss how to change the weblogic password.
First shutdown your weblogic admin and managed server’s.
Set up the environment variables.
export MW_HOME=/u01/app/oracle/middleware
export DOMAIN_HOME=$MW_HOME/user_projects/domains/SOAdomain
Rename the Data folder.
$DOMAIN_HOME/servers/AdminServer/data
$DOMAIN_HOME/servers/AdminServer/olddata
Reset the password using the following command.
$ cd $DOMAIN_HOME/security
$ java weblogic.security.utils.AdminAccount <username> <newpassword>
Update the boot properties file withe new password.
$DOMAIN_HOME/servers/AdminServer/security/boot.properties
Start the WebLogic domain.
$DOMAIN_HOME/bin/startWebLogic.sh
Once the server started , login with your new password.

Creating a JMS queue in oracle weblogic server 12C

In this post we will see how to create a JMS queue in weblogic server.
JMS queue in weblogic server will associate with some other additional resources.
A JMS server implements the JMS infrastructure in weblogic server. Destinations like queues , topics can be targeted to weblogic server instance that has a JMS server configured.
JMS Server
A JMS server acts as a management container for resources within JMS modules. A JMS server is required in order to create a JMS module.
JMS Module
A JMS module is a definition which contains JMS resources such as queues and topics. A JMS module is required in order to create a JMS queue.
Subdeployment
JMS modules are targeted to one or more WLS instances or a cluster. Resources within a JMS module, such as queues and topics are also targeted to a JMS server or WLS server instances. A subdeployment is a grouping of targets. It is also known as advanced targeting.
Connection Factory
A connection factory is a resource that enables JMS clients to create connections to JMS destinations.
JMS Queue
A JMS queue (as opposed to a JMS topic) is a point-to-point destination type. A message is written to a specific queue or received from a specific queue.
Lets start with configuration steps.
Creating a JMS server
For creating JMS server, login to your weblogic server console .
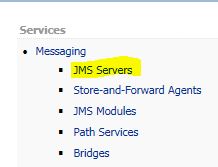
Go to Services -> Messaging -> JMS Servers
jms1.JPG
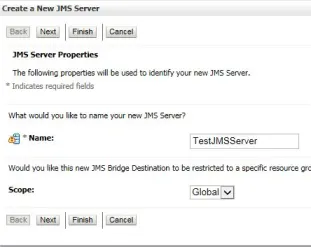
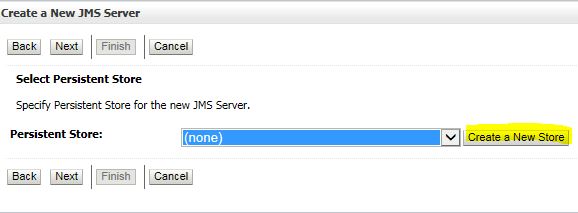
Click on New to create a JMS server . Enter the name and click on Next , For persistent store click on “Create a New Store”.
jms2jms3per
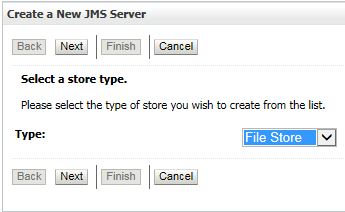
Select the Type as “File Store” and click on Next.
jms3
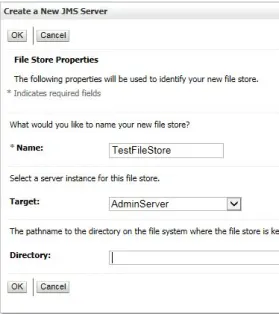
Enter the name and Target to “Admin Server” and click on Ok to finish the file store.
jms4
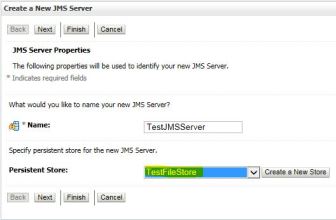
Now it will take you to JMS server configuration window, select the persistent store as “TestFileStore” which we have created above and click on Next.
jms5
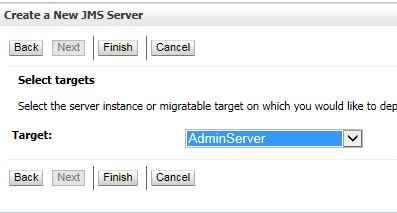
Select the Target as “Admin Server” and click on Finish button.
jms6.JPG
You can see that JMS server is created and targeted to Admin server.
jms7
Creating a JMS Module
Go to Services -> Messaging -> JMS Modules
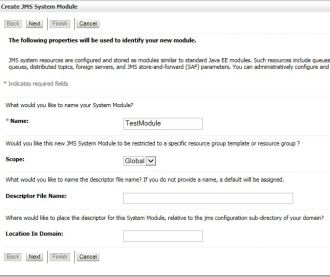
Click on New to create a new JMS module, provide the name and click on Next.
jms8.JPG
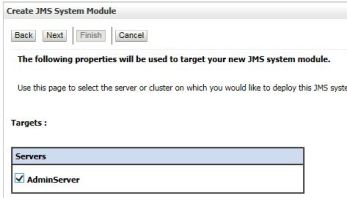
Select the Target as “Admin Server” and click on Next.
jms9.JPG
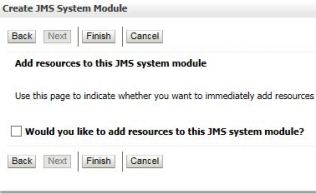
Click on Finish button to complete the set up for JMS module.
jms10.JPG
Creating a SubDeployment
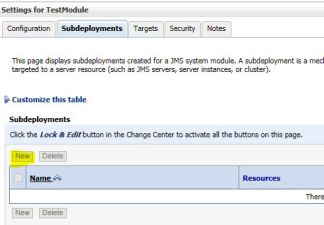
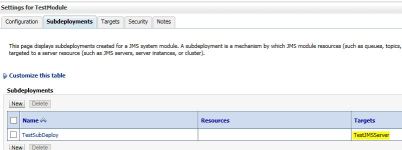
Now open your newly created JMS module (TestModule) and go to “SubDeployments” tab.
Click on New to create a new sub deployment.
jms11.JPG
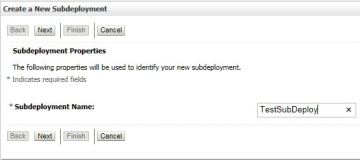
Enter the name and click on Next.
jms12
Select the Target as “TestJMSserver” and click on Finish button.
jms13.JPG
Now you can see that your Subdeplyment created and targeted to JMS server.
jms14.JPG
Creating a Connection Factory
Go to Services -> Messaging -> JMS Modules
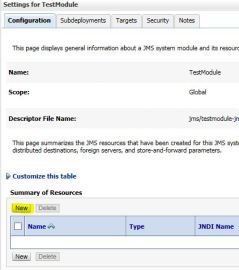
Now open your newly created JMS module (TestModule) and click on New to create a new connection factory.
jms15.JPG
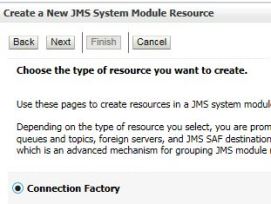
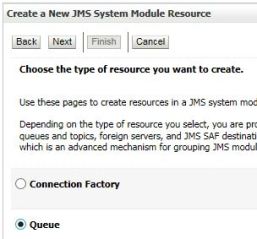
Select the radio button “Connection Factory” and click on Next.
jms16.JPG
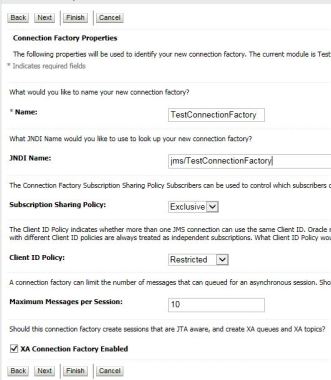
Provide the name and JNDI name click one Next.
jms17.JPG
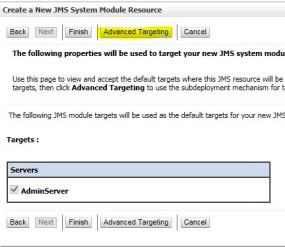
In targets page , click on “Advanced Targeting” option to target to the subdeployment we have created earlier.
jms18
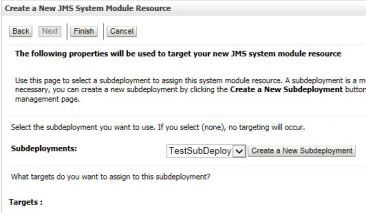
Select the Subdeployment (TestSubDeploy) and click on Finish.
jms19.JPG
Now you can see the connection factory is created and targeted to the TestJMSServer.
jms20.JPG
Creating a JMS Queue
Go to Services -> Messaging -> JMS Modules
Now open your newly created JMS module (TestModule) and click on New to create a new Queue.
jms21.JPG
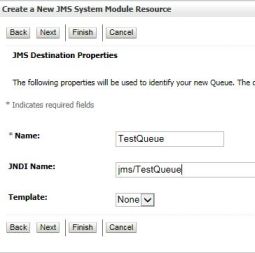
Provide the queue name and JNDI name and click on Next.
jms22.JPG
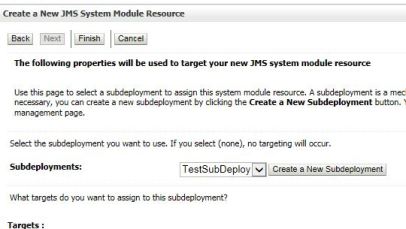
Select the Subdeployment (TestSubDeploy) and click on Finish.
jms23.JPG
Now you can see the queue is created and targeted to the TestJMSServer.
jms24.JPG
JMS queue set up is complete and it is ready to use.