In this post we will see how to create a JMS queue in weblogic server.
JMS queue in weblogic server will associate with some other additional resources.
A JMS server implements the JMS infrastructure in weblogic server. Destinations like queues , topics can be targeted to weblogic server instance that has a JMS server configured.
JMS Server
A JMS server acts as a management container for resources within JMS modules. A JMS server is required in order to create a JMS module.
JMS Module
A JMS module is a definition which contains JMS resources such as queues and topics. A JMS module is required in order to create a JMS queue.
Subdeployment
JMS modules are targeted to one or more WLS instances or a cluster. Resources within a JMS module, such as queues and topics are also targeted to a JMS server or WLS server instances. A subdeployment is a grouping of targets. It is also known as advanced targeting.
Connection Factory
A connection factory is a resource that enables JMS clients to create connections to JMS destinations.
JMS Queue
A JMS queue (as opposed to a JMS topic) is a point-to-point destination type. A message is written to a specific queue or received from a specific queue.
Lets start with configuration steps.
Creating a JMS server
For creating JMS server, login to your weblogic server console .
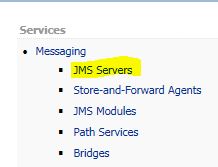
Go to Services -> Messaging -> JMS Servers
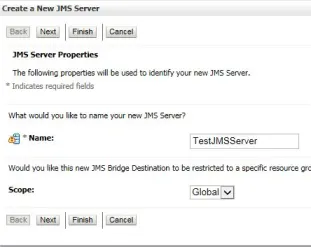
Click on New to create a JMS server . Enter the name and click on Next , For persistent store click on “Create a New Store”.

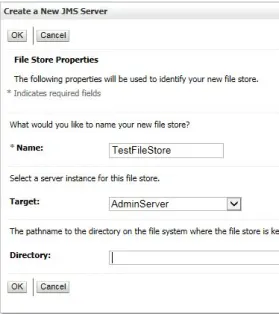
Select the Type as “File Store” and click on Next.

Enter the name and Target to “Admin Server” and click on Ok to finish the file store.
Now it will take you to JMS server configuration window, select the persistent store as “TestFileStore” which we have created above and click on Next.
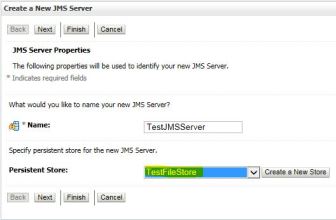
Select the Target as “Admin Server” and click on Finish button.
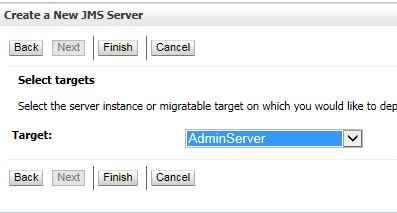
You can see that JMS server is created and targeted to Admin server.

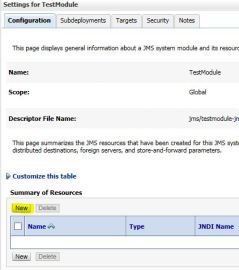
Creating a JMS Module
Go to Services -> Messaging -> JMS Modules
Click on New to create a new JMS module, provide the name and click on Next.
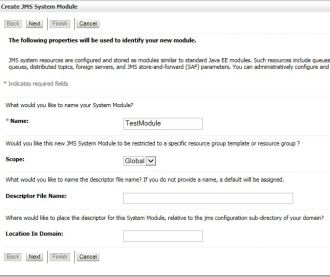
Select the Target as “Admin Server” and click on Next.
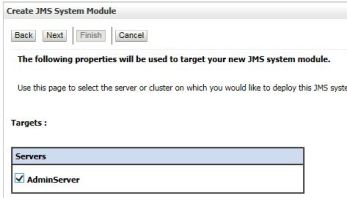
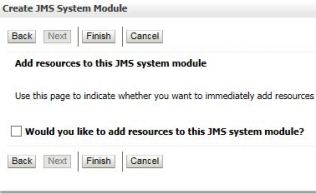
Click on Finish button to complete the set up for JMS module.
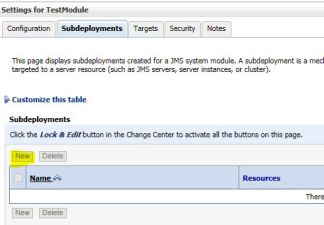
Creating a SubDeployment
Now open your newly created JMS module (TestModule) and go to “SubDeployments” tab.
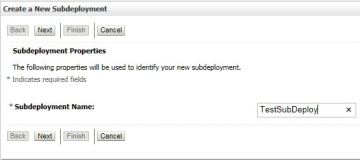
Click on New to create a new sub deployment.
Enter the name and click on Next.
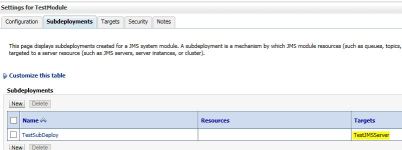
Select the Target as “TestJMSserver” and click on Finish button.

Now you can see that your Subdeplyment created and targeted to JMS server.
Creating a Connection Factory
Go to Services -> Messaging -> JMS Modules
Now open your newly created JMS module (TestModule) and click on New to create a new connection factory.
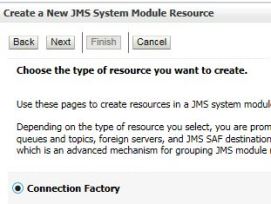
Select the radio button “Connection Factory” and click on Next.
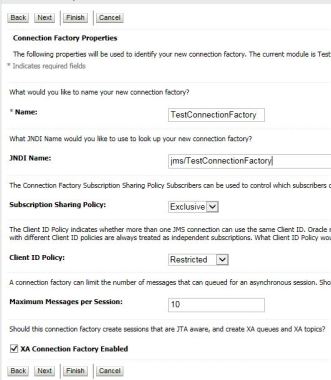
Provide the name and JNDI name click one Next.
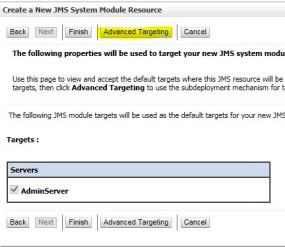
In targets page , click on “Advanced Targeting” option to target to the subdeployment we have created earlier.
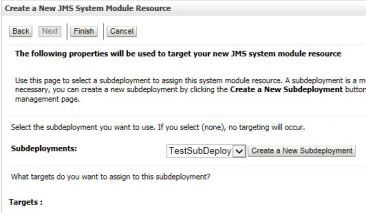
Select the Subdeployment (TestSubDeploy) and click on Finish.
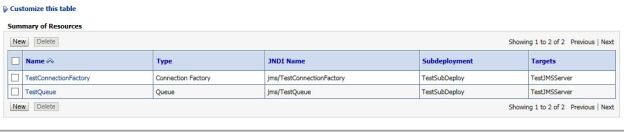
Now you can see the connection factory is created and targeted to the TestJMSServer.

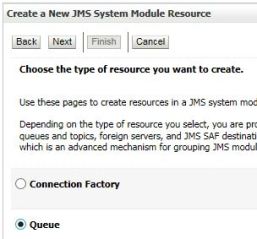
Creating a JMS Queue
Go to Services -> Messaging -> JMS Modules
Now open your newly created JMS module (TestModule) and click on New to create a new Queue.
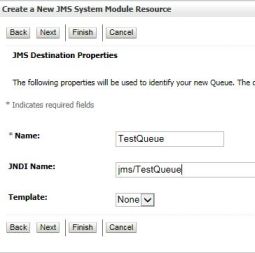
Provide the queue name and JNDI name and click on Next.
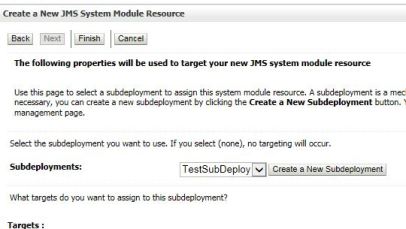
Select the Subdeployment (TestSubDeploy) and click on Finish.
Now you can see the queue is created and targeted to the TestJMSServer.
JMS queue set up is complete and it is ready to use.
No comments:
Post a Comment