Showing posts with label JMS Adapter. Show all posts

Monday, 8 January 2018

Creating a JMS queue in oracle weblogic server 12C

In this post we will see how to create a JMS queue in weblogic server.
JMS queue in weblogic server will associate with some other additional resources.
A JMS server implements the JMS infrastructure in weblogic server. Destinations like queues , topics can be targeted to weblogic server instance that has a JMS server configured.
JMS Server
A JMS server acts as a management container for resources within JMS modules. A JMS server is required in order to create a JMS module.
JMS Module
A JMS module is a definition which contains JMS resources such as queues and topics. A JMS module is required in order to create a JMS queue.
Subdeployment
JMS modules are targeted to one or more WLS instances or a cluster. Resources within a JMS module, such as queues and topics are also targeted to a JMS server or WLS server instances. A subdeployment is a grouping of targets. It is also known as advanced targeting.
Connection Factory
A connection factory is a resource that enables JMS clients to create connections to JMS destinations.
JMS Queue
A JMS queue (as opposed to a JMS topic) is a point-to-point destination type. A message is written to a specific queue or received from a specific queue.
Lets start with configuration steps.
Creating a JMS server
For creating JMS server, login to your weblogic server console .
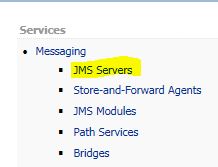
Go to Services -> Messaging -> JMS Servers
jms1.JPG
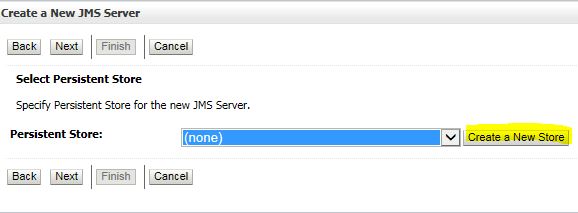
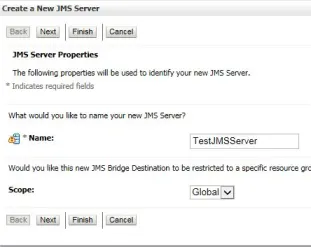
Click on New to create a JMS server . Enter the name and click on Next , For persistent store click on “Create a New Store”.
jms2jms3per
Select the Type as “File Store” and click on Next.
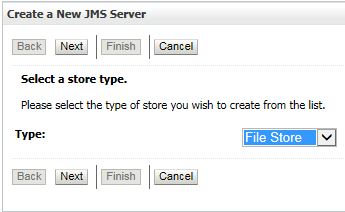
jms3
Enter the name and Target to “Admin Server” and click on Ok to finish the file store.
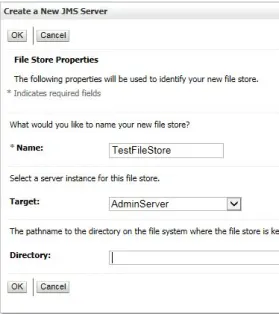
jms4
Now it will take you to JMS server configuration window, select the persistent store as “TestFileStore” which we have created above and click on Next.
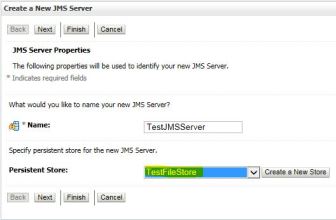
jms5
Select the Target as “Admin Server” and click on Finish button.
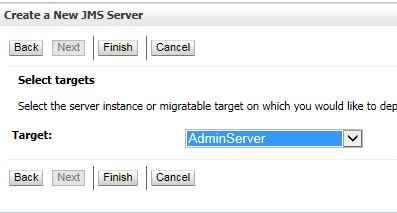
jms6.JPG
You can see that JMS server is created and targeted to Admin server.

jms7
Creating a JMS Module
Go to Services -> Messaging -> JMS Modules
Click on New to create a new JMS module, provide the name and click on Next.
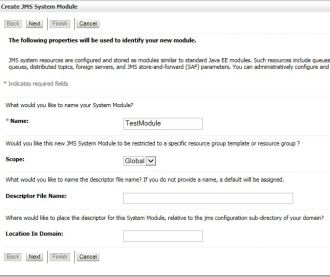
jms8.JPG
Select the Target as “Admin Server” and click on Next.
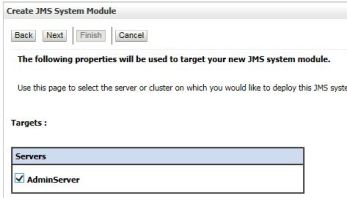
jms9.JPG
Click on Finish button to complete the set up for JMS module.
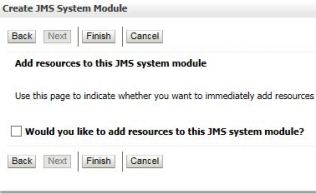
jms10.JPG
Creating a SubDeployment
Now open your newly created JMS module (TestModule) and go to “SubDeployments” tab.
Click on New to create a new sub deployment.
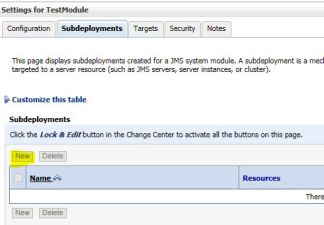
jms11.JPG
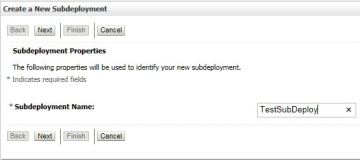
Enter the name and click on Next.
jms12
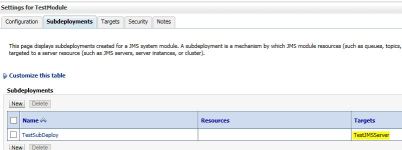
Select the Target as “TestJMSserver” and click on Finish button.

jms13.JPG
Now you can see that your Subdeplyment created and targeted to JMS server.
jms14.JPG
Creating a Connection Factory
Go to Services -> Messaging -> JMS Modules
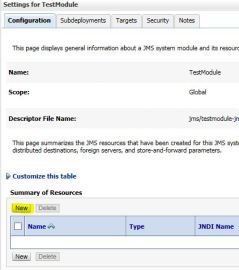
Now open your newly created JMS module (TestModule) and click on New to create a new connection factory.
jms15.JPG
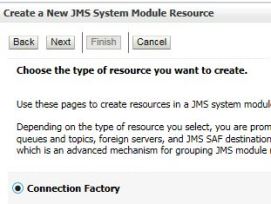
Select the radio button “Connection Factory” and click on Next.
jms16.JPG
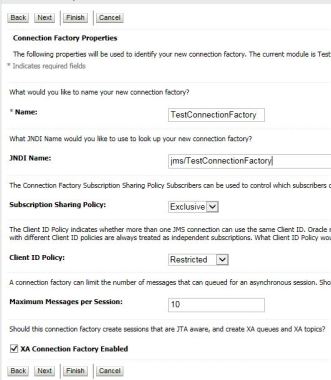
Provide the name and JNDI name click one Next.
jms17.JPG
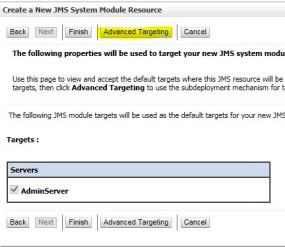
In targets page , click on “Advanced Targeting” option to target to the subdeployment we have created earlier.
jms18
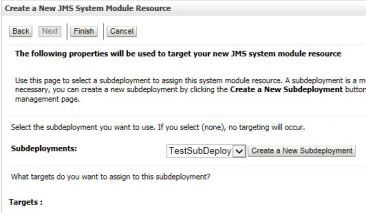
Select the Subdeployment (TestSubDeploy) and click on Finish.
jms19.JPG
Now you can see the connection factory is created and targeted to the TestJMSServer.

jms20.JPG
Creating a JMS Queue
Go to Services -> Messaging -> JMS Modules
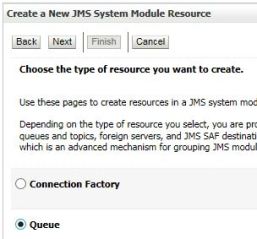
Now open your newly created JMS module (TestModule) and click on New to create a new Queue.
jms21.JPG
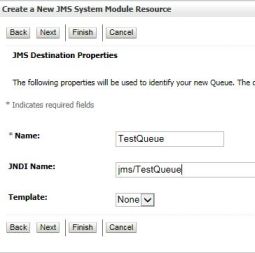
Provide the queue name and JNDI name and click on Next.
jms22.JPG
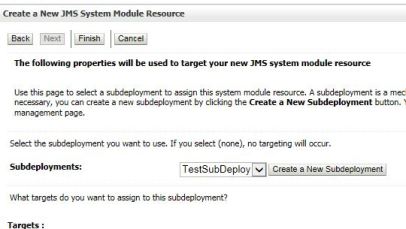
Select the Subdeployment (TestSubDeploy) and click on Finish.
jms23.JPG
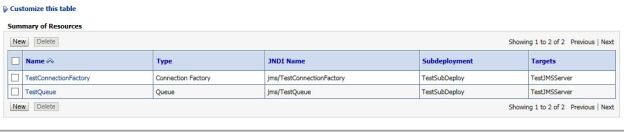
Now you can see the queue is created and targeted to the TestJMSServer.
jms24.JPG
JMS queue set up is complete and it is ready to use.

Creating JMS server, JMS module, JMS Connection Factory and JMS Queue through WLST

In this post we will see how to Creating JMS server, JMS module, JMS Connection Factory and JMS Queue using wlst scripts.
Create a directory in your system and create a properties file with below information and name it as “JMSconfig.properties“.
# 1 – ENTER Server Connection details
server.url = t3://localhost:7001
username = weblogic
password = welcome1
# 2 – ENTER JMSServer details
jms.server.name = TEST_JMSServer
store.name = TEST_JDBCStore
tragated.jms.server.name = AdminServer
# 3 – ENTER  SystemModule Details
system.module.name = TEST_JMSModule
tragated.system.module.name = AdminServer
# 4 – ENTER  ConnectionFactory Details
connection.factory.name = TEST_ConnectionFactory
connection.factory.jndi.name = jms/TEST_CF
# 5 – ENTER  Unit Of Order Details
unit.of.order.value = 1
# 6 – ENTER  SubDeployment & Queue Details
queue.sub.deployment.name = Sub_TEST_Queue
queue.name = TEST_Queue
queue.jndi.name = jms/TEST_Q
Now in the same directory create a new file for JMS script with below script and name it as “JMSConfig.py
from java.io import FileInputStream
import java.lang
import os
import string
propInputStream = FileInputStream(“domain.properties”)
configProps = Properties()
configProps.load(propInputStream)
# 1 – Connecting details
serverUrl = configProps.get(“server.url”)
Username = configProps.get(“username”)
Password = configProps.get(“password”)
# 2 – JMSServer details
jmsServerName = configProps.get(“jms.server.name”)
storeName = configProps.get(“store.name”)
tragatedJMSServerName = configProps.get(“tragated.jms.server.name”)
# 3 – SystemModule Details
systemModuleName = configProps.get(“system.module.name”)
tragatedSystemModuleName = configProps.get(“tragated.system.module.name”)
# 4 – ConnectionFactory Details
connectionFactoryName = configProps.get(“connection.factory.name”)
ConnectionFactoryJNDIName = configProps.get(“connection.factory.jndi.name”)
# 5 – Unit Of Order Details
unitOfOrderValue = configProps.get(“unit.of.order.value”)
# 6 – SubDeployment & Queue Details
queueSubDeploymentName = configProps.get(“queue.sub.deployment.name”)
queueName = configProps.get(“queue.name”)
queueJNDIName = configProps.get(“queue.jndi.name”)
redirect(‘wlst.log’,’false’)
# 1 – Connecting to the Destination 
connect(Username,Password,serverUrl)
edit()
# 2 – JMSServer details
print “================== JMSSever ===================”
startEdit()
cmo.createJMSServer(jmsServerName)
print “Created a JMSServer !!”
cd(‘/Deployments/’+jmsServerName)
cmo.setPersistentStore(getMBean(‘/JDBCStores/’+storeName))
print “PersistentStore has been set for the JMSServer !!”
set(‘Targets’,jarray.array([ObjectName(‘com.bea:Name=’+tragatedJMSServerName+’,Type=Server’)], ObjectName))
print “Targeted the JMSServer !!”
activate()
print “”
# 3 – SystemModule Details
print “================== SystemModule ===================”
startEdit()
cd(‘/’)
cmo.createJMSSystemResource(systemModuleName)
print “Created a SystemModule !!”
cd(‘/SystemResources/’+systemModuleName)
set(‘Targets’,jarray.array([ObjectName(‘com.bea:Name=’+tragatedSystemModuleName+’,Type=Server’)], ObjectName))
print “Targeted the SystemModule !!”
activate()
print “”
# 4 – ConnectionFactory Details
print “================== ConnectionFactory ===================”
startEdit()
cd(‘/JMSSystemResources/’+systemModuleName+’/JMSResource/’+systemModuleName)
cmo.createConnectionFactory(connectionFactoryName)
cd(‘/JMSSystemResources/’+systemModuleName+’/JMSResource/’+systemModuleName+’/ConnectionFactories/’+connectionFactoryName)
cmo.setJNDIName(ConnectionFactoryJNDIName)
print “Created a ConnectionFactory !!”
cd(‘/JMSSystemResources/’+systemModuleName+’/JMSResource/’+systemModuleName+’/ConnectionFactories/’+connectionFactoryName+’/SecurityParams/’+connectionFactoryName)
cmo.setAttachJMSXUserId(false)
cd(‘/JMSSystemResources/’+systemModuleName+’/JMSResource/’+systemModuleName+’/ConnectionFactories/’+connectionFactoryName)
cmo.setDefaultTargetingEnabled(true)
print “Targeted the ConnectionFactory !!”
activate()
print “”
# 5 – Unit Of Order Details
print “================== Unit Of Order ===================”
startEdit()
cd(‘/JMSSystemResources/’+systemModuleName+’/JMSResource/’+systemModuleName+’/ConnectionFactories/’+connectionFactoryName+’/DefaultDeliveryParams/’+connectionFactoryName)
cmo.setDefaultUnitOfOrder(unitOfOrderValue)
print “Changed Unit Of Order !!”
activate()
print “”
# 6 – SubDeployment & Queue Details
print “================== SubDeployment & Queue ===================”
startEdit()
cd(‘/SystemResources/’+systemModuleName)
cmo.createSubDeployment(queueSubDeploymentName)
print “Created a SubDeployment for Queue !!”
cd(‘/JMSSystemResources/’+systemModuleName+’/JMSResource/’+systemModuleName)
cmo.createQueue(queueName)
print “Created a Queue !!”
cd(‘/JMSSystemResources/’+systemModuleName+’/JMSResource/’+systemModuleName+’/Queues/’+queueName)
cmo.setJNDIName(queueJNDIName)
cmo.setSubDeploymentName(queueSubDeploymentName)
cd(‘/SystemResources/’+systemModuleName+’/SubDeployments/’+queueSubDeploymentName)
set(‘Targets’,jarray.array([ObjectName(‘com.bea:Name=’+jmsServerName+’,Type=JMSServer’)], ObjectName))
print “Targeted the Queue to the created subdeployment !!”
activate()
print “”
cmd = “rm -f wlst.log”
os.system(cmd)
To use this script, we need to edit the properties file at the top of the program.
Now place both the properties and python file  in the server location(cd /your/fmwhome/wlserver/server/bin/)
Set the domain environment by running the below command.
cd /your/fmwhome/wlserver/server/bin/> setDomainEnv.cmd
Now run the python script with below command.
/your/fmwhome/wlserver/server/bin/>  java weblogic.WLST JMSConfig.py

Saturday, 2 September 2017

Oracle SOA JMS Adapter Tuning - Number of Inbound Threads

To improve performance, the adapter.jms.receive.threads property can be tuned for an adapter service. The default value is 1, but multiple inbound threads can be used to improve performance. When specified, the value of adapter.jms.receive.threads is used to spawn multiple inbound poller threads.

For example:
<service name="dequeue" ui:wsdlLocation="dequeue.wsdl">
<interface.wsdl interface="http://xmlns.oracle.com/pcbpel/adapter/jms/textmessageusingqueues
  /textmessageusingqueues/dequeue%2F#wsdl.interface(Consume_Message_ptt)"/>
<binding.jca config="dequeue_jms.jca">
<property name="adapter.jms.receive.threads" type="xs:string" many="false">10</property>
</binding.jca">
</service>

These setting need to be done in 10g - BPEL.xml or 11g Composite.xml

In this case  there will be 10 concurrently processing threads.

JMS Queue - Difference between a Queue and a Topic.

This is a typical interview question: What is the difference between a Queue and a Topic ( or Queue Vs Topic).

Before you go for the comparisons you need to learn the basics such as what is a JMS Queue what was the purpose of this technology and so on...

I would like to point you to this wiki page:

Topic: Java Message Service


After you have reviewed the above page you might have understood what is the difference already. But for those who are time short... read on.

First Elements of an JMS Queue:

JMS provider
    An implementation of the JMS interface for a Message Oriented Middleware (MOM). Providers are implemented as either a Java JMS implementation or an adapter to a non-Java MOM.

JMS client    An application or process that produces and/or receives messages.

JMS producer/publisher    A JMS client that creates and sends messages.

JMS consumer/subscriber
    A JMS client that receives messages.

JMS message
    An object that contains the data being transferred between JMS clients.

JMS queue
    A staging area that contains messages that have been sent and are waiting to be read. Note that, contrary to what the name queue suggests, messages have to be delivered in the order sent A JMS queue only guarantees that each message is processed only once.

JMS topic    A distribution mechanism for publishing messages that are delivered to multiple subscribers.  

Source: Java Message Service

The comparison: Queue VS Topic

Queue:

  • Point-to-point model
  • Only one consumer gets the message
  • Messages have to be delivered in the order sent
  • A JMS queue only guarantees that each message is processed only once.
  • The Queue knows who the consumer or the JMS client is. The destination is known.
  • The JMS client (the consumer) does not have to be  active or connected to the queue all the time to receive or read the message.
  • Every message successfully processed is acknowledged by the consumer.


Descriptive example: A JMS queue is a channel through which users "pull" messages they want to receive using the p2p model, instead of automatically receiving messages on a particular topic. The producer submits messages to the queue, and recipients can browse the queue and decide which messages they wish to receive. In the p2p model, users can see the contents of the messages held in the queue before deciding whether or not to accept their delivery.


Topic: 

  • Publish/subscribe model
  • Multiple clients subscribe to the message
  • There is no guarantee messages have to be delivered in the order sent
  • There is no guarantees that each message is processed only once. -- As this can be sensed from the model 
  • The Topic, have multiple subscribers and there is a chance that the topic does not know all the subscribers. The destination is unknown.
  • The subscriber / JMS client needs to the active when the messages are produced by the producer, unless the subscription was a durable subscription.
  • No, Every message successfully processed is not acknowledged by the consumer/subscriber.
Descriptive Example: A JMS topic is the channel through which users subscribe to receive specific messages from a producer in the publish-and-subscribe model of JMS messaging. The model can be compared to subscribing to a newspaper; for example, if John Doe subscribed to "The New York Times," he would receive the paper every day from the newspaper producer. Similarly, if John Doe used JMS messaging to subscribe to a particular topic, he would receive all sent messages from a producer regarding that topic.