Monday, 28 November 2016

Understand "elementFormDefault" and "attributeFormDefault"

elementFormDefault="qualified"
 
Here, i am providing an example to create an xsd with 
elementFormDefault="qualified"
NOTE: observe qualifiers in xml (blue color text).
<?xml version="1.0" encoding="UTF-8"?>
<schema xmlns="http://www.w3.org/2001/XMLSchema"
               targetNamespace="http://example.org/calcSchemaDoc"
               xmlns:tns="http://aimtech.org/calcSchemaDoc"
               elementFormDefault="qualified">
  
      <element name="response">           
            <complexType>
            <sequence>       
                  <element name="fieldOne" type="integer"/> 
                  <element name="fieldTwo" type="integer"/> 
                  <element name="result" type="integer"/> 
                  <element name="typeOfOperation" type="string"/>
            </sequence> 
            </complexType>     
      </element>
</schema>

By Following above XSD if we create a valid XML, then it looks as below
valid XML:
<
ns:response xmlns:ns="http://example.org/calcSchemaDoc">
      <ns:fieldOne>100</
ns:fieldOne>
      <
ns:fieldTwo>200</ns:fieldTwo>
      <
ns:result>300</ns:result>
      <
ns:typeOfOperation>add</ns:typeOfOperation>
</
ns:response>

XPath Requirement:
a) create Xpath to get the value of "fieldTwo" element.
XPath: /ns:response/ns:result/text()
result: 300
*****************************************************************************************************
elementFormDefault="unqualified"


Here, i am providing an example to create an xsd with elementFormDefault="unqualified" 

<?xml version="1.0" encoding="UTF-8"?>
<schema xmlns="http://www.w3.org/2001/XMLSchema"
                targetNamespace="http://aimtech.org/calcSchemaDoc"
              xmlns:tns="http://example.org/calcSchemaDoc"
              elementFormDefault="unqualified">

      <element name="response">
            <complexType>
            <sequence> 
                  <element name="fieldOne" type="integer"/>
                  <element name="fieldTwo" type="integer"/> 
                  <element name="result" type="integer"/> 
                  <element name="typeOfOperation" type="string"/> 
             </sequence> 
            </complexType>      </element>
</schema>


valid XML:

<?xml version="1.0" encoding="UTF-8"?> 
<ns:response xmlns:ns="http://example.org/calcSchemaDoc">
      <fieldOne>100</fieldOne>
      <fieldTwo>200</fieldTwo>
      <result>300</result>
      <typeOfOperation>add</typeOfOperation>
</ns:response>
NOTE: No need to use qualifiers in xml sub elements, because as per XSD we set elementFormDefault="unqualified"
 
XPath Requirement:

a) create Xpath to get the value of "fieldTwo" element.
XPath: /ns:response/result/text()
result: 300

JSON(JavaScript Object Notation)

JSON is a syntax for storing and exchanging data.
JSON is an easier-to-use alternative to XML.

JSON Syntax Rules:
    Data is in name/value pairs
    Data is separated by commas
    Curly braces hold objects(note: one xml record can be treated as one json object)
    Square brackets hold arrays

observer below examples to understand how to create JSON documents.
ex1(one object with one data field):
xml:
<firstName>john</firstName>
json:
{ "firstName": "john" }


ex2(one object with two data field):
xml:
<firstName>john</firstName>
<lastName>Doe</lastName>
json:
{"firstName":"John", "lastName":"Doe"}


ex3(one object with three data field):
xml:
<firstName>john</firstName>
<lastName>Doe</lastName>
<middleName>xyz</middleName>
json:
{"firstName":"John", "lastName":"Doe", "middleName":"xyz"}


ex4:
xml:
<employee>
    <firstName>john</firstName>
    <lastName>Doe</lastName>
</employee>
json:
{"employee": {"firstName": "john","lastName": "Doe"}}

ex5(One json object with nested array json objects):
xml:
<employees>
    <emp>
        <firstName>john</firstName>
        <lastName>Doe</lastName>
    </emp>
    <emp>
        <firstName>Anna</firstName>
        <lastName>Smith</lastName>
    </emp>
    <emp>
        <firstName>Peter</firstName>
        <lastName>Jones</lastName>
    </emp>
</employees>
json:
{
  "employees": {
                "emp":
                    [
                      {"firstName": "john","lastName": "Doe"},
                      {"firstName": "Anna","lastName": "Smith"},
                      {"firstName": "Peter","lastName": "Jones"}
                     ]
                }
}

ex6(One json object with nested multiple(same and different types) json objects):
xml:
<school>
    <student>
        <sno>101</sno>
        <sName>sai</sName>
    </student>
    <student>
        <sno>101</sno>
        <sName>sai</sName>
    </student>
    <class>
        <std>6</std>
        <section>A</section>
    </class>
</school>
json:
{
  "school": {
             "student": [
                            {"sno": "101","sName": "sai"},
                            {"sno": "101","sName": "sai"}
                        ],
             "class": {"std": "6","section": "A"}
            }
}

online tool:
http://www.utilities-online.info/xmltojson/#.VrxfNFJgm0U
use this tool to validate and understand how json is working.


XML vs JSON:
NOTE: XML and JSON both are the data interchange formats accessed over WEB. Both of these formats have their own pros/cons. No one is replacement of other. Use the right tool for the right job.
1. JSON format is lightweight over XML.
2. JSON can contain integers, strings, lists, arrays. XML is just elements and nodes that need to be parsed into integers and so on before it can be consumed.
3. The most important disadvantage of JSON is that the format is very hard to read for humans, and that, of course,    every single comma, quote, and bracket should be in exactly the correct place. While this is also true of XML, JSON’s welter of complicated-looking syntax, like the }}]} at the end of the data snippet, may frighten the newbies and make for complicated debugging.
4. Serialization format for your data, JSON is smaller, lighterweight and generally faster than XML.
5. JSON is best for consumption of data in web applications from webservices for its size and ease of use, especially due to the built-in support in JavaScript.
6. For configurations file XML is better choice to make because it more human readable.
7. XML is document-oriented. JSON is data-oriented. JSON can be mapped more easily to object-oriented systems.
8. XML and JSON both use Unicode.That help in support for internationalization.
9. JSON does not have afeature, so it is not well suited to act as a carrier of sounds or images or other large binary payloads. JSON is optimized for data.
10. XML documents can contain any imaginable data type – from classical data like text and numbers, or multimedia objects such as sounds, to active formats like Java applets or ActiveX components.
11.JSON is a better data exchange format. XML is a better document exchange format. Use the right tool for the right job.
12. For Data delivery between servers and browsers, JSON is better choice.For storing Information in configuration files on the server side, XML is better choice.
13. Querying data: Using XPath, it’s possible to get direct access to a part of multiple parts of an XML data structure; no such interface exists for JSON. To get data from a JSON structure, you must know exactly where it is or else iterate over everything until you find it.
14. To extract data from database; XML is the only choice.
Imagine the computation overhead for parsing an xml fragment compared to the instant lookup in JSON.
NOTE: post your comments and subscribe to my blog.

File Adapter MOVE operation in Oracle SOA 11g

File Adapter MOVE operation in Oracle SOA Suite 11g

The Oracle File and FTP Adapters let you copy or move a file from one location to another, or delete a file from the target directory. Additionally, the Oracle FTP Adapter lets you move or copy files from a local file system to a remote file system and from a remote file system to a local file system. This feature is implemented as a interaction specification for outbound services. So, this feature can be accessed either by using a BPEL invoke activity or a Mediator routing rule.

Step 1 :
Drag drop file adapter in reference pane of composite.xml

Setp 2:
In file adapter wizard perform below steps.

In wizard step4 we have to select Synchronous Read File
NOTE : You have selected Synchronous Read File as the operation because the WSDL file that is generated because this operation is similar to the one required for the file I/O operation.

provide your own name as per naming convention which you follow.
In my case i provided "FileMove" as move operation name.

Enter a dummy physical path for the directory for incoming files, and then click Next. The File name page is displayed.
Note: The dummy directory is not used. You must manually change the directory in a later step.

Enter a dummy file name, and then click Next. The Messages page is displayed.

Note: The dummy file name you enter is not used. You must manually change the file name in a later step.
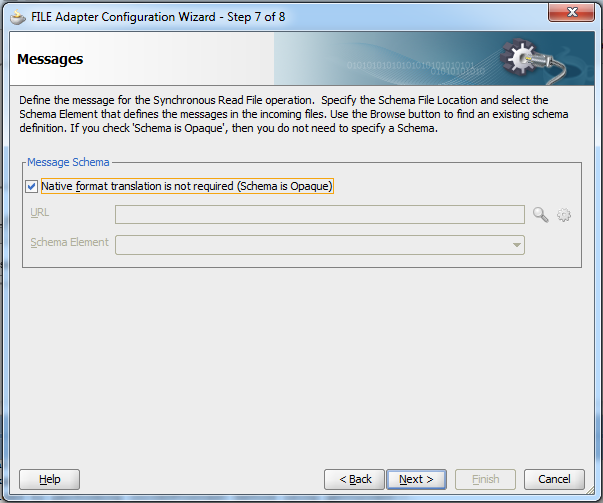
Select Native format translation is not required (Schema is opaque), and then click Next. The Finish page is displayed.
Note: we are planning to perform move operation so we no need to process the payload. For this reason no need to create an XSD.


Step 3:
now open file adapter .jca file which looks as below.

=====================================================================
<adapter-config name="FileAdptMoveTest" adapter="File Adapter" wsdlLocation="FileAdptMoveTest.wsdl" xmlns="http://platform.integration.oracle/blocks/adapter/fw/metadata">
  
  <connection-factory location="eis/FileAdapter"/>
  <endpoint-interaction portType="FileMove_ptt" operation="FileMove">
    <interaction-spec className="oracle.tip.adapter.file.outbound.FileReadInteractionSpec">
      <property name="DeleteFile" value="true"/>
      <property name="PhysicalDirectory" value="C:/Dummy path"/>
      <property name="FileName" value="dummyFileName.txt"/>
    </interaction-spec>
  </endpoint-interaction>
</adapter-config> =====================================================================

Step 4:

Now replace <endpoint-interaction>-----</endpoint-interaction> with below code.
<interaction-spec className="oracle.tip.adapter.file.outbound.FileIoInteractionSpec">
      <property name="SourcePhysicalDirectory" value="foo1"/>
      <property name="SourceFileName" value="bar1"/>
      <property name="TargetPhysicalDirectory" value="foo2"/>
      <property name="TargetFileName" value="bar2"/>
      <property name="Type" value="MOVE"/>
</interaction-spec>

After the change in .jca file, it should looks as below.
=================================================================
<adapter-config name="FileAdptMoveTest" adapter="File Adapter"
                wsdlLocation="FileAdptMoveTest.wsdl"
                xmlns="http://platform.integration.oracle/blocks/adapter/fw/metadata">
    <connection-factory location="eis/FileAdapter"/>
    <endpoint-interaction portType="FileMove_ptt" operation="FileMove">
        <interaction-spec className="oracle.tip.adapter.file.outbound.FileIoInteractionSpec">
            <property name="SourcePhysicalDirectory" value="C:\Users\Fusion\Desktop\source"/>
            <property name="SourceFileName" value="student.txt"/>
            <property name="TargetPhysicalDirectory" value="C:\Users\Fusion\Desktop\target"/>
            <property name="TargetFileName" value="studentNew.txt"/>
            <property name="Type" value="MOVE"/>
        </interaction-spec>
    </endpoint-interaction>
</adapter-config>
=================================================================
Note : Note: You have modified the className attribute, and added SourcePhysicalDirectory, SourceFileName,TargetPhysicalDirectory, TargetFileName and Type.  The Type attributes decides the type of operation. Apart from MOVE, the other acceptable values for the Type attribute are COPY and DELETE.

Note :  SourceFileName and TargetFileName no need to be same. we can provide different file names.

Note : Currently, the values for the source and target details are dummy. You must populate them at run-time with .The source and target details are hardcoded in the preceding example. You can also provide these details as run-time parameters.

       (a) create 4 string variables in BPEL.
                   <variable name="sourceDirectory" type="xsd:string"/>
                   <variable name="sourceFileName" type="xsd:string"/>
                   <variable name="targetDirectory" type="xsd:string"/>
                   <variable name="targetFileName" type="xsd:string"/>

Note: Make sure about namespace in .bpel file. Just cross check below namespace is available in .bpel or not.
                   xmlns:xsd="http://www.w3.org/2001/XMLSchema"

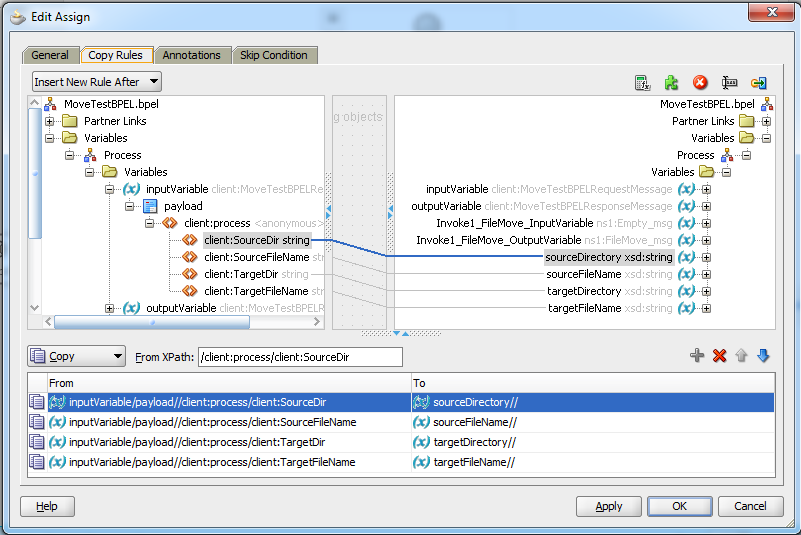
      (b) get the source and target folder path , source and target file name from any source. Like recieve activity input variable or from a DVM or from a table. Some how get the required data and by using Assign activity copy the data from proper source to newly created variables.


Step 5:

Now open .bpel source view.
Add custom properties in invoke activity.

Existing code:
 <invoke name="Invoke1" inputVariable="Invoke1_FileMove_InputVariable"
                outputVariable="Invoke1_FileMove_OutputVariable"
                partnerLink="FileAdptMoveTest" portType="ns1:FileMove_ptt"
                operation="FileMove" bpelx:invokeAsDetail="no"/>

Modified Code:
 <invoke name="Invoke1" inputVariable="Invoke1_FileMove_InputVariable"
                outputVariable="Invoke1_FileMove_OutputVariable"
                partnerLink="FileAdptMoveTest" portType="ns1:FileMove_ptt"
                operation="FileMove" bpelx:invokeAsDetail="no">
<bpelx:inputProperty name="jca.file.SourceDirectory" variable="sourceDirectory"/>
<bpelx:inputProperty name="jca.file.SourceFileName" variable="sourceFileName"/>
<bpelx:inputProperty name="jca.file.TargetDirectory" variable="targetDirectory"/>
<bpelx:inputProperty name="jca.file.TargetFileName" variable="targetFileName"/>
</invoke>

sourceDirectory, sourceFileName, targetDirectory and targetFileName are string variables which we created in Step4.

NOTE : above properties syntax is related to bpel 1.1 version.

Saturday, 26 November 2016

Configuring FTP Adapter.

To use FTP Adapter, we need to configure the FTP adapter in the Weblogic Admin Console. The steps are as follows:


  1. Open WLS Admin Console.
  2. Click Deployments.
  3. Click FTP Adapter link.
  4. Click Configuration Tab link.
  5. Go to Outbound Connection Pools Tab.
  6. Click New.
  7. Check javax.resource.cci.ConnectionFactory.
  8. Enter the JNDI Name (This JNDI name will be used in the FTP adapter in JDev).
  9. Finish.

The JNDI that the FTP Adapter will use is defined. However, we need to set some properties on it. To set those properties:
  1. In the Outbound Connection Pools Tab, expand javax.resource.cci.ConnectionFactor.
  2. Click on the new JNDI that you created.
  3. Provide the following properties.
    1. Host
    2. Port (I used 21 and it worked)
    3.  Username
    4. Password
  4. Leave the other values with default values. No need to change any other values.
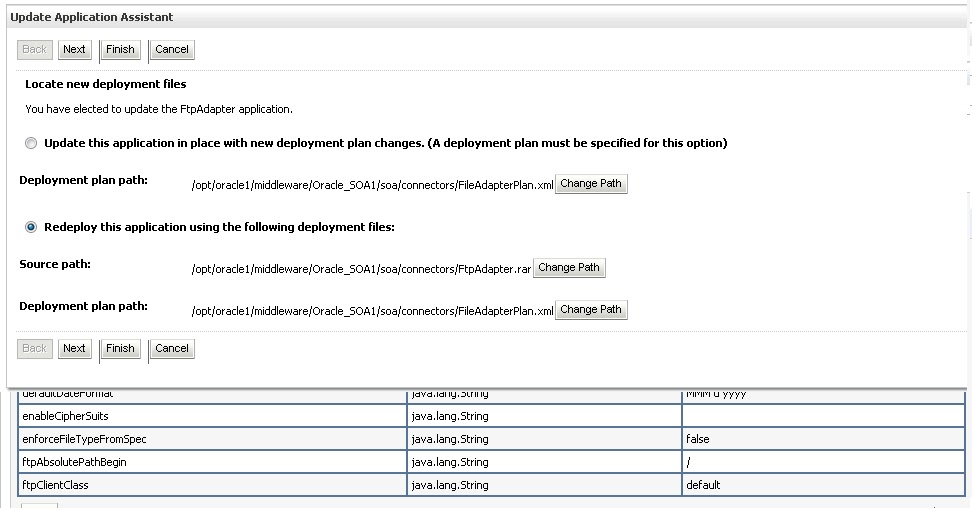
Now, we need to update the FTP Adapter to pick up these latest changes. To do that:
  1. Go to Deployments 
  2. Check FTP Adapter check box  Select table level Update button.
  3. Click Next or Finish to update.

That's all. Now, our FTP Adapter can use the JNDI to connect to the FTP server to read or write files.
Also, in the FTP Adapter, the Directory for outgoing files should point to the directory where we need to place the file on the FTP server.

Configuring the FTP Adapter in SOA 11g for SFTP

Configuring the FTP Adapter in  SOA 11g for SFTP

1)  SOA Host – This is a SFTP client host that will host the FTP adapter.
2) SFTP Server- Remote SFTP server on which you want to put or get the file.

Setting up the SFTP communication based on Public key

1) Navigate to /home/<<User1>>/.ssh directory of the SOA Host.
2) Execute the below command “ ssh-keygen”. This will generate the pair of public key and private key
ssh-keygen
Generating public/private rsa key pair.
Enter file in which to save the key (/home//<<User1>>/.ssh/id_rsa):
Enter passphrase (empty for no passphrase):
Enter same passphrase again:
Your identification has been saved in /home//<<User1>>/.ssh/id_rsa.
Your public key has been saved in /home//<<User1>>/.ssh/id_rsa.pub.
The key fingerprint is:
dddddddddddddddddddddddddddd /<<User1>>”SOAHost
The key's randomart image is:
+--[ RSA 2048]----+
|   
3)  Copy the public key of the SOA Host to remote  SFTP server’s authorized_keys file. This file is located in  “/home/<<user2>>/.ssh” directory.  Public key of the SOA server is in file “id_rsa.pub” file. Just copy the text content and copy in authorized_keys.

On Target server make sure the file and directory permission should not be too open,You can execute the below commands

cd ~
cd .ssh
chmod og-rw authorized_keys
chmod a-x authorized_keys
cd ~
chmod 700 .ssh

Also you /home/user2 should not be too open.
cd /home
chmod go-wrx user2
Also chmod 755 /home/user2 if you application need for some reason


4)  Test the SFTP setup. Login to SOA server and ssh to Remote SFTP server. One time you have to establish the authenticity of the remote SFTP server for that enter “Yes”. Please note you should prompt you for password. If this prompt of password then please review the above steps.
[user1@SOAHOST ~]$ ssh <<user2>>@ SFTPHOST
The authenticity of host IPADDRESS (IPADDRESS)' can't be established.
RSA key fingerprint isXXXXXXXXXXXXXXXXXXXX
Are you sure you want to continue connecting (yes/no)? yes
Warning: Permanently added IPADDRESS (RSA) to the list of known hosts.
 [<<user2>>@f14 ~]$

In this was you have successfully set-up the public key based Secure FTP connection from SOA Host to Remote FTP.


FTP Adapter configuration in WebLogic Application server:

  1.    Note down the JNDI name of the FTP server that you configured in the Jdeveloper. In my case this is eis/hcgftp/FtpAdapter
2)Login to WebLogic console and navigate to Deployments->FtpAdapter-> Outbound ConnectionPool. In “javax.resource.cci.ConnectionFactory” connection pool .Create the instance with the name of “eis/hcgftp/FtpAdapter”.

3)  Select the “eis/hcgftp/FtpAdapter”  and update the below properties’ value with the bold typed value
         a. authenticationType – publickey
         b. host-                <<Remoted SFTP Server Host>>
         c. port -                22
         d. privateKeyFile-  /home/<<user1>>/.ssh/id_rsa 
         e. username –      <<user2>>
         f. useSftp –           true
4) After this update the deployment FTPAdpter. Activate the changes. 


After update you get the message that two “However 2 items must be restarted for the changes to take effect.”   There is no need to start the server or no need to stop and start the FTPAdapter deployment. Only Updating the FTPAdapter deployment is enough to make File Adapter working.
5.  FTP adapter Service is ready to used by other SOA components

Wednesday, 23 November 2016

oracle.sysman.emSDK.app.exception.EMSystemException

Unable to open application in EM :: 

oracle.sysman.emSDK.app.exception.EMSystemException


Sometimes, opening a deployed application doesn't appear in EM under soa-infra tree, but exists in the list when you click on the partition. And when you click on the project from the list, it gives an error with a pop-up with a similar error as below

ADF_FACES-60097:For more information, please see the server's error log for an entry beginning with:  
ADF_FACES-60096:Server Exception during PPR, #2[[
javax.el.ELException: oracle.sysman.emSDK.app.exception.EMSystemException
  at javax.el.BeanELResolver.getValue(BeanELResolver.java:298)
  at com.sun.faces.el.DemuxCompositeELResolver._getValue(DemuxCompositeELResolver.java:173)
  at com.sun.faces.el.DemuxCompositeELResolver.getValue(DemuxCompositeELResolver.java:200)
  at com.sun.el.parser.AstValue.getValue(AstValue.java:138)
  at com.sun.el.ValueExpressionImpl.getValue(ValueExpressionImpl.java:206)
  at org.apache.myfaces.trinidad.bean.FacesBeanImpl.getProperty(FacesBeanImpl.java:68)
  at org.apache.myfaces.trinidad.component.FacesBeanWrapper.getProperty(FacesBeanWrapper.java:58)
  at org.apache.myfaces.trinidad.component.UIXTable$RowKeyFacesBeanWrapper.getProperty        
      (UIXTable.java:630)
  at org.apache.myfaces.trinidad.component.UIXComponentBase.getProperty(UIXComponentBase.java:1353)
  at org.apache.myfaces.trinidad.component.UIXIterator.getValue(UIXIterator.java:722)
  at org.apache.myfaces.trinidad.component.UIXCollection.__flushCachedModel(UIXCollection.java:1438)

To resolve described issue (I checked this out) you have two ways:

1. Restart Admin Server
2. Restart EM application
            Just go to console --> Deployments --> stop & start the 'em' application

The full restart of the AdminServer worked for me every time. Restart of the EM sometimes causes the crash of the EM application.

Now, you'll see all the deployments in the EM soa-infra tree, as well as you'll be able to open the project.