Friday, 13 January 2017

Apply Authorization Policy to SOA Composite

This blog demonstrates how to use Oracle authorization policy to restrict the access to one SOA composite in Oracle SOA 11g.
In this example SOA composite is consisted of a simple BPEL component which is exposed as Web service. 

In order to protect the SOA composite from unauthorized access Oracle policyoracle/binding_permission_authorization_policy need to be applied the service of the SOA composite.  This policy will ensure that the authenticated subject has the permission to access the resource specified in the policy.  In Oracle the application policy defines the resource to be protected, the permission class which is used to check the permission.  Here the permission class is:oracle.wsm.security.WSFunctionPermission.  The application policy also associates the resource with the application role, user or group. So the only authenticated subject which belongs to the application roles can will be granted to permission to the resource.

The authenticated subject is the entity that has been authenticated.  Thus before the authorization is applied the authentication is needed to apply first.  So the authentication policyoracle/wss_username_token_service_policy is also required.

The user and group are defined in Oracle Weblogic Admin Console and the application policy and application role are defined in Enterprise Manager.  The below diagram shows the the relationship:


Create the User and Group in Oracle Administrator Console
Login into Oracle Weblogic Administrator console.
Go to Security Realm->myrealm->Users and Groups->Users->New
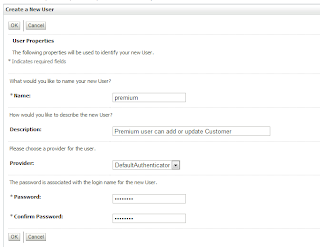
Type in your user name and password and click on OK button.


Go to Security Realm->myrealm->Users and Groups->Groups->New

Type in your group and click on OK button.


Go to Security Realm->myrealm->Users and Groups->Users. Then click on the user: premium and then click on Group tab.


Select the group CustomerManager and add to chosen. 
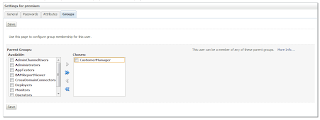
Click on OK button.

Create the Application Role in Enterprise Manager console

Login into Oracle Enterprise Manager console
Go to Farm_soa_domain->SOA and then right click on soa-infra and choose Security->Application Roles.


Click on Create... and then type in the group information.

In Members click Add...

Change the type as Group and then click Search button.   Select the group: CustomerManager which is defined in Admin Console.  Then click on OK button.


Click on Save button.


Create the Application Policy in Enterprise Manager console

Go to Farm_soa_domain->SOA and then right click on soa-infra and choose Security->Application Policies.


Click on Create... 


Click on Grantee->Add

Search Principal with type as Application Role and select the application role: CustomerManagerRole and then click on OK button.


Click on Permissions->Add
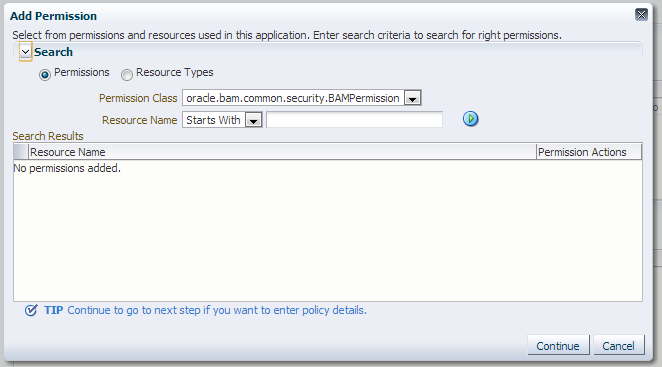
Click on Continue button.  Type in oracle.wsm.security.WSFunctionPermission in Permission Class.
and http://www.toic.com/customer/wsdl/UpdateCustomerService#update in Rescource Name and invoke in Permission Actions.


Click on Select button.


Click on OK button.


Add the policies to the service of SOA composite in JDeveloper

In JDeveloper right click on the service of the SOA composite and choose the menu item Configure WS Policies...


Click on add icon of Security to add 


Choose oracle/binding_permission_authorization_policy and then click on OK button.

Do the same to add the oracle/wss_username_token_service_policy.


Then click on OK button.  

Deploy the SOA composite to the SOA server.


Test the authorization using soapUI

The first message is the one with right user name and password: premium/welcome1 which is set up in Oracle Admin console.


  1. <soapenv:Envelope xmlns:soapenv="http://schemas.xmlsoap.org/soap/envelope/" xmlns:cus="http://www.toic.com/customer">
  2. <soapenv:Header>
  3. <wsse:Security xmlns:wsse="http://docs.oasis-open.org/wss/2004/01/oasis-200401-wss-wssecurity-secext-1.0.xsd">
  4. <wsse:UsernameToken>
  5. <wsse:Username>premium</wsse:Username>
  6. <wsse:Password Type="http://docs.oasis-open.org/wss/2004/01/oasis-200401-wss-username-token-profile-1.0#PasswordText">welcome1</wsse:Password>
  7. </wsse:UsernameToken>
  8. </wsse:Security>
  9. </soapenv:Header>
  10. <soapenv:Body>
  11. <cus:UpdateCustomerRequest>
  12. <cus:CustomerID>1234567</cus:CustomerID>
  13. </cus:UpdateCustomerRequest>
  14. </soapenv:Body>
  15. </soapenv:Envelope>
The SOA composite will be successfully invoked.  The response message comes back correctly without authorization error.

If the user name/password is changed to weblogic/welcome1 which is valid user set up in Oracle Weblogic Admin console.  But this user doesn't belong to the application role which has the permission to invoke the SOA composite in the policy. Now the response message shows that the authorization is not successful.
  1. <env:Envelope xmlns:env="http://schemas.xmlsoap.org/soap/envelope/">
  2. <env:Header/>
  3. <env:Body>
  4. <env:Fault xmlns:ns0="http://docs.oasis-open.org/wss/2004/01/oasis-200401-wss-wssecurity-secext-1.0.xsd">
  5. <faultcode>ns0:FailedAuthorization</faultcode>
  6. <faultstring>FailedAuthorization : failure in authorization</faultstring>
  7. <faultactor/>
  8. </env:Fault>
  9. </env:Body>
  10. </env:Envelope>

Securing SOA Composites/Services With OWSM Policies

Oracle Web Services Manages (OWSM) is an integral component of the SOA Infrastructure in SOA Suite 11g. It provides a policy-based, completely declarative way of implementing secure SOA applications. OWSM supports centrally managed generalized, standards-based policy management, attachment policies by providing policy management functions that are available through the Oracle Enterprise Manager (EM). 

For the SERVICE that needs to be secured:

  1. Right click on the composite client, and  choose select the option Configure WS Policies.
  2. Click the + sign on the security tab and select security policy "wss_username_token_service_policy"
 

3. Press OK and deploy the service. Alternatively, the service can also be secured from EM


 For the CLIENT that needs access the secured service:

The client side policies have to be attached to the client that needs to access the service 
  1. Right click the  secured web. service component in the composite and choose the option to Configure WS Policies.
  2. Click the + sign on the security tab and select security policy "wss_username_token_client_policy".
  3. Create the binding properties  oracle.webservices.auth.username and oracle.webservices.auth.password for the user and password respectively
  4. The source code for the composite after the policy has been added will look like

<wsp:PolicyReference URI="oracle/wss_username_token_client_policy"
                           orawsp:category="security" orawsp:status="enabled"/>
      <property name="weblogic.wsee.wsat.transaction.flowOption"
                type="xs:string" many="false">WSDLDriven</property>
      <property name="oracle.webservices.auth.username" type="xs:string"
                many="false" override="may">username</property>
      <property name="oracle.webservices.auth.password" type="xs:string"
                many="false" override="may">passwd</property>


  5. Deploy the composites to test the services

Monday, 9 January 2017

HTTP binding in Soa Suite 11g PS2

With Patch Set 2 of Soa Suite 11g Oracle added the HTTP Binding to the supported Adapters. This Adapter was already a feature of Soa Suite 10g, so it is great news that is back. So when your HTTP Service returns a XML message then you can use this binding in your composite application. When the HTTP Service has a  JSON response then you can use the Spring Context Component ( With PS2 Spring Context is supported ). Lucas made a great example how you can achieve this.

In this blogpost I will show how you can use this HTTP Binding as a Service or as a Reference Adapter. I start with a Service so I can use this Service later in the Reference Adapter.
Drag the HTTP Binding from the Component Palette to the Service part of the Composite. Use Service as Type and when you want to have this Service, to return a message then you should select Request-Response as Operation Type.
Provide the Request and Response XSD and choose the right element. For the Request Message Schema you can also use the wizard. 
Next step is to wire this Service to a component. Choose a BPEL component and use the Define Service Later template.

Make a wire between the Service and the BPEL component.
Open the BPEL component and a Receive and Reply Activity and finish your BPEL. When everything is valid then you can deploy this to the Soa Suite Server.

For this HTTP Binding Service Soa Suite adds two Port types to the WSDL. This means you can also invoke this Service with a SOAP message.
  1. <wsdl:service name="execute">  
  2.         <wsdl:port name="Request_Response_pt" binding="tns:Request_Response_ptHttpGET">  
  3.             <http:address xmlns:http="http://schemas.xmlsoap.org/wsdl/http/"  location="http://laptopedwin.wh.lan:8001/soa-infra/services/default/HttpBinding/execute"/>  
  4.         </wsdl:port>  
  5.         <wsdl:port name="Request_Response_pt_soappt"   
  6. binding="tns:Request_Response_pttBinding">  
  7.             <soap:address xmlns:soap="http://schemas.xmlsoap.org/wsdl/soap/"   
  8. location="http://laptopedwin.wh.lan:8001/soa-infra/services/default/HttpBinding/execute"/>  
  9.         </wsdl:port>  
  10.     </wsdl:service>  

The Best way to test this HTTP Service is to open the endpoint url in a browser 
http://laptopedwin.wh.lan:8001/soa-infra/services/default/HttpBinding/execute
This one is better then the tester of the Enterprise manager.
Here you can choose for the normal Invoke ( Soap message ) or use REST POST or GET

Or you can use the HTTP analyzer of JDeveloper, this is a great way to see the raw request and response


The HTTP binding can also be used as a Reference adapter. For example you can use the just created Service as Endpoint. Provide the Request and Response Schema's.

To test this Reference Adapter you can add a Mediator component with the same Request and Response Schema's. Expose this Mediator as a Service and wire the Reference Adapter to the Mediator and complete the routing rule. 
Deploy this composite application, invoke the Mediator Service and take a look at the instances in the Enterprise Manager.

You can download my example at github
https://github.com/biemond/soa11g_examples/tree/master/SoaHTTPBinding
and in here I also have a txt file with all the request I did with the Wfetch tool.


Update by Rakesh


Testing of HTTP Binding adapter works from the browser just fine. It's just that how you pass the parameters.

Here's what I did:
I created a simple composite application with one input parameter and exposed it as REST service using HTTP binding adapter (GET). The service does nothing but add a string to the input parameter and returns back.

The endpoint looks like this:

soatestserver:8001/soa-infra/services/default/TestPatchProject/HTTPBindingService

When you go to test console it forms the test URL string like this

soatestserver:8001/soa-infra/services/default/TestPatchProject/HTTPBindingService/Request-Response?input=Rakesh

All along until now I was trying to use this URL from test console or from the browser.

...but this never works. It's not the right way to use it. If you try this it will return page not found.

What you actually need to use this is below:

soatestserver:8001/soa-infra/services/default/HelloHTTPProject/HTTPBindingService?input=test&operationName=Request-Response

Notice the changes in above URL. The Request-Response is not just after HTTPBindingService (as before), instead its passed as a parameter of operationName.

The above URL works just fine from browser and test console. The auto generated Test URL in test console is misleading.

Generating .csv file using FileAdapter in Oracle SOA 11g

First create a csv file in excel and save it in csv format.


Create a SOA application -> SampleCSVApp and a SOA project inside it CSVTest
Drop a FileAdapter from Component Palette and give a name like WriteCSV select the write operation Type.
Next step select the output Directory and give a file name.


In next step  select the native format builder by clicking the icon next to search icon


Select delimited option


Now here in this step you will browse the .csv file that we have created earlier 


Select the datatypes of the column and give element name


Check use the first record as the field names and select next now you will see a xsd is generated with specified type and name.


You can test it by clicking on Test and finish.


Now create a one way bpel process and in input parameter select the same sample xsd element.


Now use a transform activity to send input data to file.


The generated file will not have header names details in it.if you want to add the header name details in generated csv file .for the the generated xsd file  need to be modified and these attributes need to be added into the xsd as shown below

            nxsd:hasHeader="true"
            nxsd:headerLines="1"
            nxsd:outboundHeader="Name,EmpID,DeptID ${eol}"
            nxsd:headerLinesTerminatedBy="${eol}"


Deploy it and test it...!

Monday, 2 January 2017

ORA-04068: existing state of packages has been discarded

ORA-04068: existing state of packages has been discarded ORA-04061: existing state of package body "<pakageName>" has been invalidated ORA-04065: not executed, altered or dropped package body "<pakageName>" ORA-06508: PL/SQL: could not find program unit being called: "<pakageName>"


Issue

You have a soa process which is trying to call a procedure created in a database different than your dehydration store.
You have recompiled your procedure and the first soa instance after that is failing with the below error.

Exception occurred when binding was invoked. Exception occurred during invocation of JCA binding: "JCA Binding execute of Reference operation 'token' failed due to: Stored procedure invocation error. Error while trying to prepare and execute the custompkg.token API. An error occurred while preparing and executing the custompkg.token API. Cause: java.sql.SQLException: ORA-04068: existing state of packages has been discarded ORA-04061: existing state of package body "custompkg" has been invalidated ORA-04065: not executed, altered or dropped package body "custompkg" ORA-06508: PL/SQL: could not find program unit being called: "custompkg" ORA-06512: at line 1 Check to ensure that the API is defined in the database and that the parameters match the signature of the API. This exception is considered not retriable, likely due to a modelling mistake. To classify it as retriable instead add property nonRetriableErrorCodes with value "-4068" to your deployment descriptor (i.e. weblogic-ra.xml). To auto retry a retriable fault set these composite.xml properties for this invoke: jca.retry.interval, jca.retry.count, and jca.retry.backoff. All properties are integers. ". The invoked JCA adapter raised a resource exception. Please examine the above error message carefully to determine a resolution.

Reason

This is a know issue as the data source keeps the cache statement in the server hence the first connection fails as it is still pointing to the previous connection.

Resolution

There are two ways to resolve this issue

1> Just update your db adapter by going through the wizard once again(already created) and redeploy the process again to soa server.

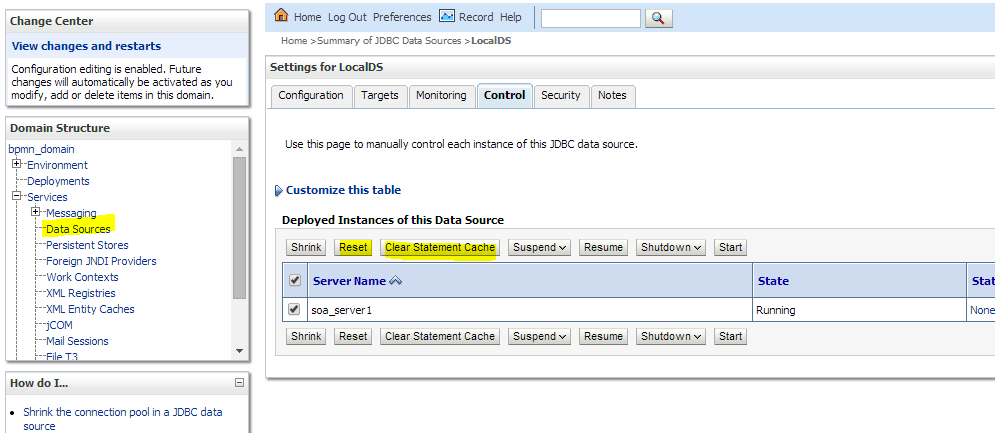
2> Clear the cache statement of your data source

Go to your admin console

http://host:port/console

Go to Services -->Data Sources

Select your data source and go to control tab

Select the soa server and click on Clearn statement cache


Then 


Once cache is cleared just reset the connection.